Throughout the semester I learned quite a bit about photography. The first thing that I think really helped me and I will remember is just what all the buttons on the camera are. Since it was not my camera I was using, it was really hard for me to understand everything at first. Although I still don't feel like I know everything about it I do feel a lot more comfortable with the camera.
The next thing that I think I learned a lot about is not only are these buttons just there but they mean a lot by what they do. It surprises me how sensitive cameras can be and by just changing a few things, it can really make or break a picture. This is obviously a really good thing to know when doing photography.
Next I think the "rules" are something that I will always remember. I have to say that I may not remember all of them but the majority I think I will and I could already tell towards the end of the semester that I was adapting to follow those rules. It also really helped to see how beneficial these rules can be.
I saw a huge change in how I view photography "tools" during this class. At the beginning when I was reading about tri-pods I thought it was kind of foolish that someone would put so much into something so simple but now I completely understand why. There were so many of my picture that would have looked better if I would have had a tri-pod. This also goes for all the filters and lenses that I never really understood.
Lastly I think the overall style and view I have on photography has changed. It is cool to see all the things you can do with it and how fun but challenging it can be. There is definitely a lot more that goes into it than I ever expected and it makes you see that it is not as simple as just pointing and shooting.
Wednesday, December 1, 2010
Saturday, November 20, 2010
Final Project
 |
| Fall Campus: I really loved the fall colors in this picture. I also love how sharp the close up leaves turned out and you can really get a dimensional awareness of the leaves coming out towards you. I liked this picture how it was and didn't do any editing. Low ISO because did not want the camera to be over sensitive to all the light come in. Medium Aperture because of the light and the medium depth. Medium Shutter because of the still shot. Camera: Olympus E510 Lens: 40-150mm Focal Length: 104mm ISO: 100 f/6.3 Shutter: 1/400 |
 |
| Yellowstone Trip: I liked this picture because of all the details it has. The colors of the trees pop and the "jagged" mountain lines really catch your eye. Then the moon up in the top is a good way to pull the eye through the entire picture. I did some cropping of the sky in this picture. I chose these settings so I was able to capture all characterestics of these pictures like the moon. Camera: Olympus E510 Lens: 40-150mm Focal Length: 40mm ISO: 200 f/9.0 Shutter: 1/400 |
 |
| Glacier Park: I took this picture when I was home over the fall and really liked it. The water did get a little blown out but I still liked the overall picture. I did some cropping on the sides of the picture and also added some soft light to the water and other areas to darken it up. I chose a slow shutter speed on this so I could try and get the ribbon effect. I could have chose a little larger aperture to possibly present the water being blown out at the bottom of the fall. Camera: Olympus E510 Lens: 40-150mm Focal Length: 108mm ISO: 400 f/5.00 Shutter: 1/40 |
 |
| Rims: This barn sits up on the rims and I have always loved the setting. I did some cropping to the picture to draw more attention in to the direct image. I also added a little saturation to create a little more emphasis on the colors. On this picture I chose a fast shutter speed and a higher aperture to create good lighting on the area since it was in a high lighting time. Camera: Olympus E510 Lens: 40-150mm Focal Length: 113mm ISO: 800 f/7.1 Shutter: 1/1000 |
 |
| Yellowstone: This picture was an interesting one because when I first looked at it I hated it. It seems to have a lot of noise going on but the longer I looked at it the more I liked it. I feel like the noise almost creates a digital vintage feel to the picture and I really liked it. I did some cropping and brightness adjustment and also a little color saturation to play up the yellows in the picture. In this picture the low ISO created a lot of details to come out and the high aperture allowed for all areas to stay in focus. Camera: Olympus E510 Lens: 40-150mm Focal Length: 84mm ISO: 200 f/10 Shutter: 1/400 |
 |
| Clouds: I took this picture towards the beginning of the semester and really liked it. I love the contrast between the clouds and how layered they look. Having all the different contrasts and shapes really draw your eye through the entire picture. I did some cropping on the picture to draw in more focus. Since my lighting in this picture was realitivly low I used a low aperture to allow for a higher amount of light to be let in. I also used not to fast of a shutter speed so I could pick up the wispiness of the clouds. Camera: Olympus E510 Lens: 40-150mm Focal Length: 82mm ISO: 200 f/4.5 Shutter: 1/140 |
 |
| Yellowstone: This picture was very much a love-hate relationship for me. The lighting on our trip was not ideal (very bright) and it really showed in this picture. I ended up having some very harsh side light in this picture so about half of the left side was blown out which created quite a bit of editing. I ended up cropping out an area of it and added some soft light to the rest to darken it up. As I said, this picture did not turn out great. If I would have used possibly a faster shutter speed so not as much light was let in and a higher aperture I could have captured a better image. Camera: Olympus E510 Lens: 40-150mm Focal Length: 65mm ISO: 400 f/4.5 Shutter: 1/160 |
 |
| Rims: I love the sky in this picture. All the contrast the picture offers is great. You are getting a lot of contrast in the sky and also between the sky and the foreground. The tree creates a sense of height and draws your eye between the dark sky and light foreground. I did some cropping in this photo. The problem I had with this picture is if you blow it up the picture is not as sharp as I would like. If I would have used possibly a faster shutter speed that could have helped reduce the noise. Camera: Olympus E510 Lens: 40-150mm Focal Length: 64mm ISO: 800 f/7.1 Shutter: 1/500 |
 |
| Sunset: Once again this picture has a lot of contrast that I like. You are getting the opposite effect on this picture than the last but you still have the dark scattered clouds in the center to pull your eye through. I did a little bit of cropping and some minor saturation adjustments to play up the colors. I think if I would have used a lower aperture and lower ISO I would have picked up more detail on this picture would have made it a lot better. I did use a low shutter so I picked up more of the colors and the light that was there. Camera: Olympus E510 Lens: 40-150mm Focal Length: 92mm ISO: 800 f/7.1 Shutter: 1/200 |
 |
| Fog: I was not incredibly impressed with how this picture turned out but I still kinda liked it. It is definately different which I like but I think it ended up not being quite as sharp as I would have liked. The only editing I did to this picture was a little bit of cropping Camera: Olympus E510 Lens: 40-150mm Focal Length: 76mm ISO: 400 f/14.0 Shutter: 1/250 |
 |
| Campus: I love this picture. I really love how the leaves pop against the blue sky and dark branches. I also really love how the leaves create a frame around the shot. I did some soft light on the branches to add a little light to show some details in the bark. In this picture I chose the aperture mainly because of all the light I had shining on the focal point of the picture. I also had a low ISO which picked up a lot of detail. The slow shutter speed also offset the high aperture in the picture. Camera: Olympus E510 Lens: 40-150mm Focal Length: 40mm ISO: 100 f/18 Shutter: 1/60 |
 |
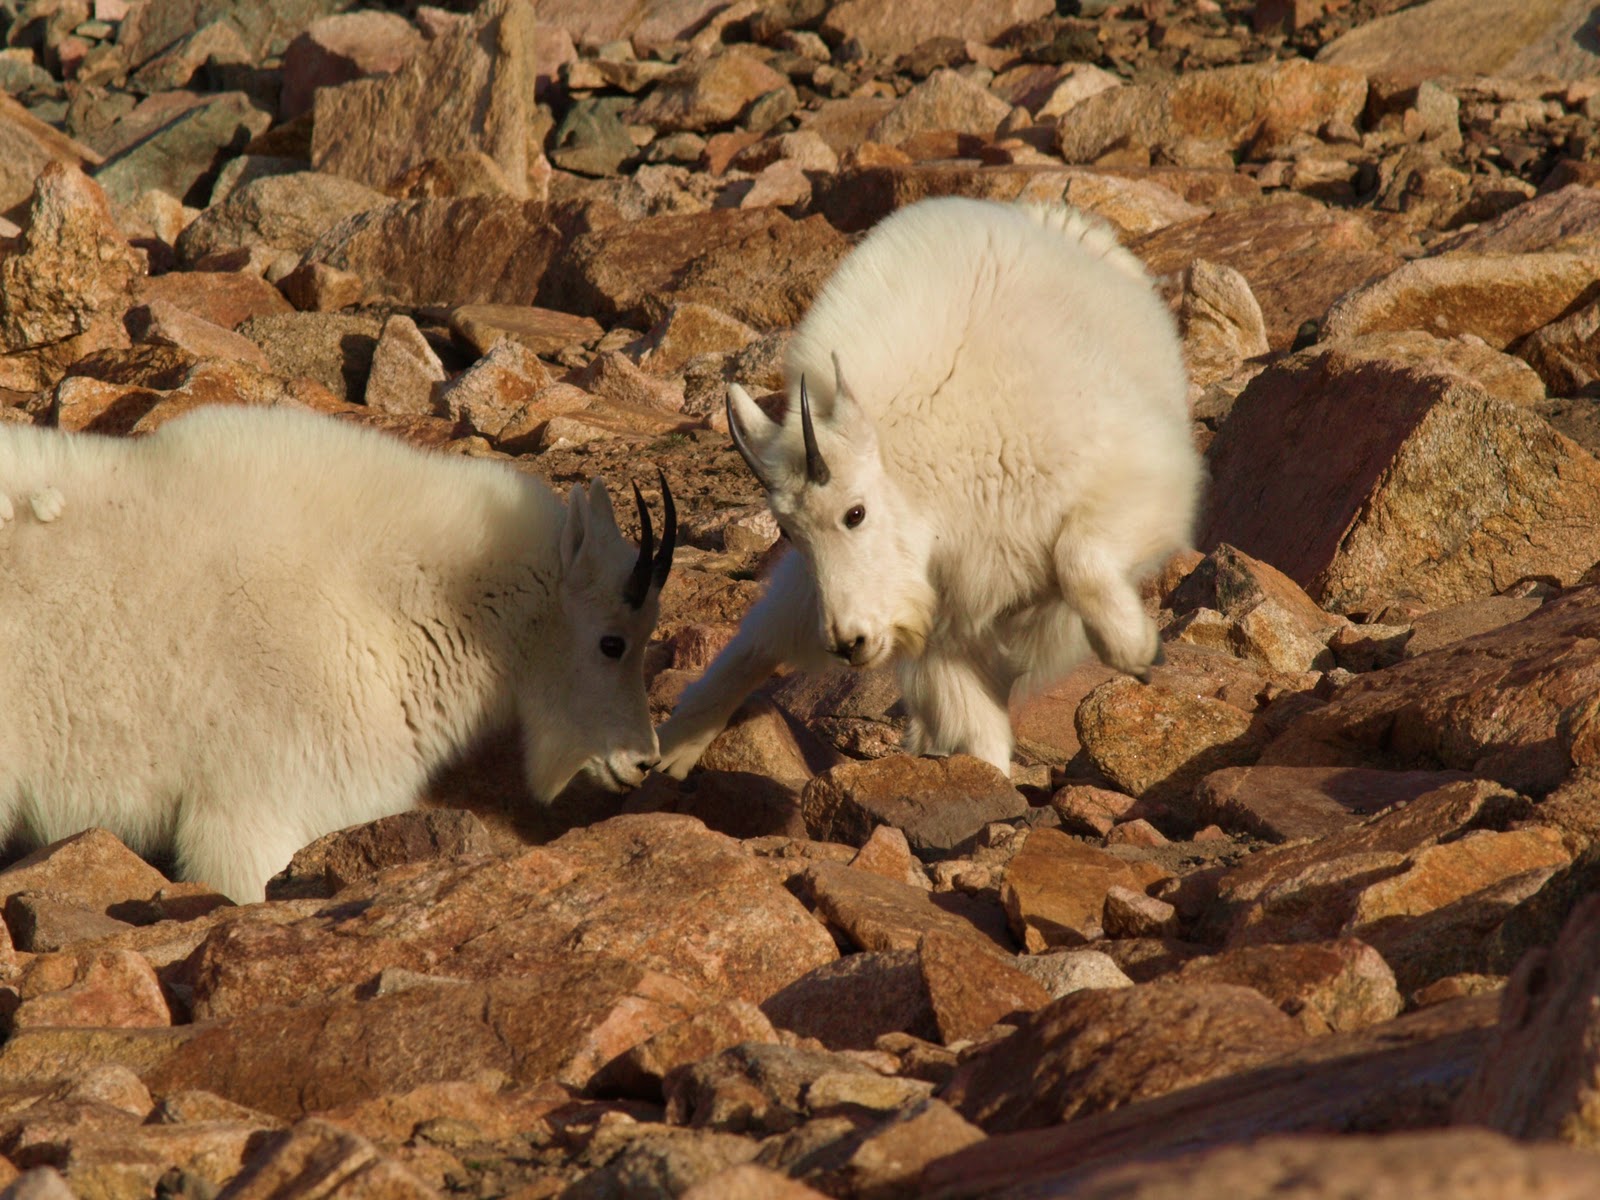
| Yellowstone: I thought this picture turned out well because you really catch a sense of expression in the picture. The background isn't anything to amazing but I still liked the picture. I did some cropping to get rid of some background landscaping that distracted from the picture. Since this shot was pretty standard and the main focus was just on the animal, I did not have to do much with settings (they are all pretty standard). There was not much contrast between light, textures, color, etc so I could pick these standards and not worry about overthinking the shot. Camera: Olympus E510 Lens: 40-150mm Focal Length: 150mm ISO: 400 f/10 Shutter: 1/200 |
 |
| Rims: Once again I love the dark sky in this picture and the contrast between the sky and the grass. I did some cropping to add more of a portrait type shot and a little saturation adjustment to the grass. In this picture I think all the details created not the best picture. The colors are good but I think if I would have used a faster shutter speed and a lower aperture, it would have created more focus on the grass with not so much blur. I also could have used a higher ISO to allow the camera to be more sensitive to the light and detail. Camera: Olympus E510 Lens: 40-150mm Focal Length: 40mm ISO: 800 f/10 Shutter: 1/640 |
 |
| Glacier Park: This was a challenging picture but I was pleased with how it turned out. It is not exactly how I would like it but I still feel it captured a good picture. I did some soft lighting to the water in the picture to try and darken some areas that got blown out. This picture I had to have a slow shutter speed to catch the movement of the water. I also needed a low aperture to let in light but in this case I think I could have raised the aperture a bit so some areas would not have been blown out like I said. Camera: Olympus E510 Lens: 40-150mm Focal Length: 84mm ISO: 400 f/5.00 Shutter: 1/40 |
 |
| Yellowstone: I love this picture mainly because of all the layering it has to offer. You are getting many many layers with the mountains, hills, trees (dark and light) and then the single bunch of trees standing alone. I did a little saturation adjustment to try and enhance the light colored trees. I think the settings for this picture were all good. The ISO allowed for good detail to show and the aperture was good for lighting. I think the tool that would have really helped for this picture would have been a polarizer to allow the colors to pop more especially the blue sky. Camera: Olympus E510 Lens: 40-150mm Focal Length: 40mm ISO: 200 f/8.1 Shutter: 1/400 |
 |
| Beartooth Pass: The thing I liked about this picture was, once again, the emotion. I liked how they were all coming together and meeting head on. I did some cropping to eliminate some of the distracting landscape in the background. This picture I think would have benefited from a lower aperture and possibly a faster shutter speed. I also could have lowered the ISO a bit to pick up more detail in the picture. Camera: Olympus E510 Lens: 40-150mm Focal Length: 150mm ISO: 400 f/11 Shutter: 1/500 |
 |
| Yellowstone: This picture did not turn exactly how I was hoping but I still liked the reflection aspect. I did some cropping on this picture and some soft light to brighten up the dark areas of the trees. Camera: Olympus E510 Lens: 40-150mm Focal Length: 40mm ISO: 400 f/11 Shutter: 1/250 |
 |
| Yellowstone: This picture has great diagnol lines that draw your eye through the picture. I kept the picture the way it was and didn't do any editing. Camera: Olympus E510 Lens: 40-150mm Focal Length: 40mm ISO: 400 f/11 Shutter: 1/100 |
 |
| Yellowstone: I liked how the blue in this picture contrasted so well with the trees and how well the trees framed the picture. I did a little cropping on the picture to draw it in. Medium ISO allowed for some light sensitivity but not too much. High aperture could have been used to create more depth. Camera: Olympus E510 Lens: 40-150mm Focal Length: 40mm ISO: 400 f/7.1 Shutter: 1/500 |
 |
| Yellowstone: The colors and patterns in this picture really stood out to me. I did a little saturation adjustment to brighten the greens up. Camera: Olympus E510 Lens: 40-150mm Focal Length: 40mm ISO: 400 f/11 Shutter: 1/100 |
 |
| I loved the colors in this picture and also just the flow of the entire picture. The red is very appealing, as we already know, and the different patterns draw your eye around. I did a little bit of cropping to get rid of areas that did not add to the picture. High aperture created good depth and details. High ISO created more detail and light for colors. Camera: Olympus E510 Lens: 40-150mm Focal Length: 40mm ISO: 400 f/13 Shutter: 1/400 |
 |
| Yellowstone: This was another layered setup that I really liked. Unfortunatly the down fall to this picture is that the sky got way blown out. I did some saturation adjustments to brighten up the colors. Should have used a higher aperture to help with the sky. Polarizer would have helped also. Camera: Olympus E510 Lens: 40-150mm Focal Length: 40mm ISO: 200 f/4.5 Shutter: 1/400 |
 |
| Rims: This was near the barn setting that I really liked and I also loved this picture. I love the fence line and how it draws your eye through the entire picture. Then with the contrast between the sky and the grass it really makes it pop. I did some cropping of the foreground on this picture. Faster shutter because of the still shot on moving grass. Medium aperture to not create a great depth of field so there was the blurred background. High ISO for detail. Camera: Olympus E510 Lens: 40-150mm Focal Length: 48mm ISO: 800 f/7.1 Shutter: 1/1000 |
 |
| Campus: I love this picture and how it focused so well on the center branches and the light really makes it pop. I also like how the blurred leaves frame the picture so well without being a distraction. I did not do any editing on this picture just because I liked it so much how it was. Low settings were due to the low light. Low ISO was because of the slow shutter speed because I wanted it less sensitive due to the longer exposure. Camera: Olympus E510 Lens: 40-150mm Focal Length: 123mm ISO: 100 f/4.5 Shutter: 1/160 |
 |
| Yellowstone: As I am sure you can see, the main reason I chose this picture was because it is a face! I took this picture not even realizing that and then when I was going through I noticed it and instantly loved it. I did not make any adjustments to the picture. Shutter for no movement. High aperture so it did not get overexposed. ISO for detail. Camera: Olympus E510 Lens: 40-150mm Focal Length: 40mm ISO: 400 f/11 Shutter: 1/100 |
 |
| Beartooth Pass: Once again, I love the emotion in this picture. I did use some soft light on the eyes to lighten them up especially where the shadow hit and I did some saturation adjustments to enhance the rock color. Little faster shutter speed captured in action without blur. ISO allowed for detail and texture. High aperture created depth, could have overexposed more for whitenessCamera: Olympus E510 Lens: 40-150mm Focal Length: 150mm ISO: 400 f/11.0 Shutter: 1/640 |
 |
| Yellowstone: The main reason I took this picture was because I was thinking of the "photography rules" and diagnol lines. I really liked how the picture turned out especially with the distressed marks on the wood and the character it shows. I did some saturation adjustments to play up the brown a little more. Shutter did not have to be too quick cause there was no movement. Ap was high so it did not overexpose. ISO was set to show detail Camera: Olympus E510 Lens: 40-150mm Focal Length: 64mm ISO: 400 f/11 Shutter: 1/100 |
 |
| I loved how well the yellow leaves popped in this picture. I felt like this picture really displayed the difference rule and how it is more attractive than conformity. I used a little soft light on this picture to darken a little bit of the wet rocks to darken some of the glare. Shutter was medium and ap was small to let light in and ISO was set to show detail and colors. Camera: Olympus E510 Lens: 40-150mm Focal Length: 74mm ISO: 400 f/4 Shutter: 1/320 |
 |
| Rims: I felt like this picture showed a lot of character. It has a very rustic feel while also capturing the beauty of nature. I loved how the fence draws your eye along with the blowing tumbleweed and having the barn in the background I felt enhanced the rustic feel. I did some cropping of the foreground on this picture. ISO was high for details. Ap was set to medium so it created some depth but not a lot. Camera: Olympus E510 Lens: 40-150mm Focal Length: 57mm ISO: 800 f/7.1 Shutter: 1/1250 |
 |
| Yellowstone: This picture displays great colors and lines which is what I really loved about it. I love the areas where the water is sparkling and where the light is hitting and causing the colors to pop. I did some cropping on the right corner for this picture. Camera: Olympus E510 Lens: 40-150mm Focal Length: 65mm ISO: 400 f/11 Shutter: 1/50 |
Wednesday, November 10, 2010
Nature Photography Section Six Recap
The sixth and final section of our natural photography book was titled "Digital Processing." The first area focused on "Digital Darkroom Equipment: Storing images in the field and processing them in the studio." In nature photography you are most likely going to be adventuring in the field, no where near a computer or back up device. This is why nature photographers typically do what they can to carry multiple smaller memory cards so they are not "putting all their eggs in one basket." You always want to be prepared for a malfunction or the possibility of losing a card. By having multiple, you always have a back up just in case.
If you are working somewhere where you might not have a computer available for some time, you may want to consider having a portable storage drives. This will allow you to move all your images as well as see what your battery level and space available is. If you are only looking for backup storage for your computer you may consider just using an external hard drive. These are best if they are small and portable and can power and get their data from the computer.
The other major tool you need to be a nature photographer is a computer and the software to go along with it. You want something that is made for this type of work and will be able to deal with the constant storage of photos and software. Adobe Photoshop is the most common type of photo editing software and is the best start out for anyone considering a career in digital photography.
Next the book focused on "Preparing Images for Presentation: Professional art print, website or print media display." This section focused on what you need to do to prepare your photos for display. Not only do you need to know how to take the picture but you also need to know what you need to do to make the most out of the photo and how you need to go about that.
The book started out by focusing on the common way photographers take pictures which is in the RAW mode. This allows the picture to be saved the exact way the picture was taken and does not make any adjustments or tweaking to the image. You then need to convert this RAW image into a TIFF or PSD format before you open the photo for editing in Photoshop. From there on the book began focusing on exact adjustments that may be done to a photo to make the best out of it.
When adjusting a picture you can adjust basically anything about it. The common adjustments are; Brightness levels, levels curve, color saturation, color balance, contrast, sharpness,etc. All of these adjustments have there own tools and ways to go about them and they all allow for freedom when creating the image you want. There are also many other adjustments our tools that may be used to basically build the image you desire. Retouching allows for you to maybe correct those flaws you accidently got while shooting and can allow for you to maybe fix a flaw that was present in the subject no matter what. You also have the ability to place something you possibly desired into the picture to add contrast or patterns in your images. Overall the possibilities are endless and you really can do pretty much whatever your heart desires when editing your images.
Nature Photography Section Five Recap
Part five in our photography book was directed at "The Close-up World." The first section was "Working at Close Range: How to use special accessories and lenses for close-up photography." This section focused on exactly what it says, how to capture that close-up photo. It started by talking about the tools necessary to get that close-up shot such as macro lenses and extension tubes and bellows. Bellow tubes and extension tubes are a device that allow for magnification while also keeping a quality image. The only common downfall for these tools is the fact that they often reduce the light transmitted by the lens which creates a limit of the range of stop-action photography.
Some alternatives to these methods are to use a close-up supplementary lense which will not limit the amount of light which is a bonus for close-up shots. Another way to get these close up shots is to use a teleconverter. A teleconverter is a tool that will increase the focal length of the lense while maintaining the focusing range. A common and very effective combo is to put a teleconverter and a telephoto lense to capture those close up shots with things like birds, butterflies, etc.
By using a telephoto lense you are still allowing the distance between you and the subject so you are keeping it in its natural state uneffected by your presence. You may also use wide-angle lenses with a short extension tube or a tilt-shift lense to maximize your depth of field. Another tool that is often used in close-up shooting is using an electronic flash. This allows for the correct amount of illumination and prevents shadowing or other undesirable effects in your image.
Next the book focused on "Wild Flora: Conventional and offbeat approaches to one of nature's most expressive subjects." There are many factors that come into play when photographing a picture even if it is "just a flower." With flowers you also need to be very aware of the atmosphere and what is happening especially if winds are present. You need to be prepared for the movement of the flowers just like you would an animal. You also need to be very aware of lighting and what you need to do to capture the best colors and traits to your photo.
High light is also a problem typically faced when photographing flowers but one great thing is that you have greater ability to block out or control this lighting when you are working with something likes flowers. A common tool is to just place an umbrella over to block out the unwanted light and to create the lighting you find necessary. Not only do you need to be aware of the light but also everything else around the image. You need to create a portait and focus on the same things you would focus on if you were capturing a close up on an animal.
Angles also play a huge roll when capturing the floral image and you need to be aware of the different views you want to portray. You can get that aerial image by shooting above and looking down or you may chose to get the image from bellow or direct ahead when can increase your depth-of-field causing a more "scenery" based image. Even though shooting flowers seem so simple, there are still many things that need to be focused on in order to get that perfect picture.
Nature Photography Section Four Recap
Section four of our nature photography book is titled "Light on the Land." The first area it focused on was called "Finding Photogenic Landscapes: Ten clues to evaluating the photographic potential of any landscape setting." This mainly talked about what to look for in a scene for a great picture. It focused on things like color and how it can really draw to a photo. It also once again focused on the significance of clouds when taking pictures. Clouds are an excellent way to draw another layer to your photos while also creating a more preferable lighting. Another whether related aspect to look for in a landscape is a calm atmosphere. This will create a great depth of field and often can get very powerful shot. You need to be aware of what can affect your photo and what you need to adjust to these things when dealing with wind or any other atmospheric changes.
"Light on Land" also looked at things such as angles and what angels can do to a photo. It talked about looking at the scene from a north/south angle in order to get the correct lighting for the scene which typically is side light. It also talked about grasping some foreground details to add more depth and detail to a photo and drawing the viewer throughout the photo.
Next was "The Power of Perspective: How to infuse your landscape photos with the impression of three dimensions." This whole section was kind of a repeat of past stuff we had learned. It started out by talking about sizing up your picture again. By sizing up your lanscape shots you can create a sense of depth and focus on the picture. You also may use angles to capture a sense of depth and what you want to stand out or maybe blend into the scene. This section also confronted the aspect of highs and lows and the fact that if we just stand and take a picture we often miss the stuff that is directly in front of us. If you are looking to capture a depth in your image or a foreground you are hoping to get, you may want to consider taking the image from a low angle for a great depth in the image. You may also use overlapping to create a depth or different perspective on an image.
There are also ways to use weather or atmospherical conditions to your advantage when trying to get a certain perspective. Haze can often create a different dimension in a scene along with many other weather trends. As stated earlier the sun plays a major roll in photography. Sidelight can often be used to embrace a different perspective on a shot. It is an excellent tool to create a dimensional image that you may not be able to grasp any other way. It is a greate way to create volume in a picture and allows for comparisons to be made throughout the photo.
The last topic that was discussed in section four was "Nature's Mystical Mirrors: How to record dramatic reflections of the landscape." Reflection can be an excellent and very powerful tool in nature photography. When trying to capture a reflection you may need to expand a little on your typical "outdoor wear" and may need to focus on waders and everything water proof. It often takes a little more "dirty work" to capture that perfect reflection and getting into the water is typically expected.
When trying to capture a reflection you need to pay great attention to the typical photography aspects. You need to size things up and timing is very key when trying to capture a reflection shot. Reflections are also very dependent on atmospheric conditions and don't be surprised if your planned reflection shoot does not go as planned. When shooting reflections filters are very important and you will want some sort of polarizing filter and a split neutral density filter. By using filters you will get the best out of your filter while also keeping a natural tone.
Tuesday, November 9, 2010
Nature Photography Section Three Recap
Section three of our nature photography book is titled "Adventures with Wildlife." This entire section of the book just came across as being very much common since to me. It is something that I guess if you didn't know you maybe should know just for common interaction with animals or wildlife. They all seemed like basic skills and was something that I think most people would understand.
The first area we looked at was titled "Getting Close: Techniques to draw within camera range of wild subjects." To me this section was pretty much all common sense. It talked about strategies to get up close with wildlife. These were things such as; knowing how the animal will react, approaching slowly, don't trap the animal or make it feel threatened, etc. It also talked about "tools" to use out in the field such as blinds and "incentives" such as peanut butter. This whole section just seemed like stuff anyone would know about wildlife and animals in general.
Next the book talked about "Animals in Action: Creating a stage and other techniques for recording animals in action." Once again, a lot of this information seemed like common sense subjects. The first main aspect focused on was title "know your habitats." I would hope that anyone who was really getting out there in the field would know a thing or two about the area they are in. You want to know what animals are around and what kind of a situation you will be dealing with. You need to know what kind of places you would find them in and how they will be acting. The thing that I thought was a little strange with this section was that it mainly focused on viewing animals in refuges or on a tour. I guess this is typical for a lot of people but I would think that you would really study or research the animal as much as possible in their natural environment.
The "Animals in Action" section also gave tips on how to shoot these scenes. It talked about being where you want to be before sun rise. This is mainly because animals work on a bit of a different clock than we do. Arriving late to the scene will ultimatly leave you with not much to shoot and missing all the beginning of the day action. It also talked about getting down and viewing the animal at their level. It stated that by lowering your tripod you create a more "intimate" image. You get that eye to eye view which allows for that much more intense image. It also stated that setting a stage for a photo and almost waiting for what you anticipate to happen. This technique is very common with a birds nest or a typical spot an animal may be seen. This also leads back to just understanding the actions and the habitat of the subject you are trying to capture.
Lastly, section three of the book focused on "Wildlife Portraits: Layering the picture space and other techniques for expressive portraiture." This area just talked about capturing the right image when dealing with more close up, one on one shots. It talked about using more upclose lenses verses a wide angle or using telephoto to get that action shot they you may not be able to get close to. A technique the book talks about using is the layering picture space. This is a way to draw into the subject but by still revealing the habitat it lives in. One common thing I would think of for this topic is by showing an animal bedded down. Maybe you had a fawn bedded down in grass and you go the foreground as the grass, the midground as the fawn and the background as the surrounding scenery. You do want to make sure that you have other key characteristics in the photo.
These characteristics are things that make the photo. You want to make sure that the subject in the photo is portrayed correctly. Is it sized up in the image how it should be and is it something that someone would want to publish. You want it to be interesting to a viewer and to draw them in. By sizing the subject up correctly and making sure you are keeping the main subject sharp, especially facial features, you will capture the viewer. You want to make sure that you are always getting that image that you want to portray. If you are getting a group shot, you want to make sure that all elements are visually interesting and you are not just slacking off in areas.
Nature Photography Section Two Recap
The next section we read in the book was section two which is titled "Essential Skills." The first thing we looked at in section two was exposure, which the author states as "capturing all the image data in difficult situations. We started out by looking at tools to getting the correct exposure. This was things such as using the histogram, metering and specific exposure modes. The different exposure modes are; aperture priority, shutter priority and manual mode. Probably the most common in nature photography is the aperture mode which allows for you to pick the correct aperture and then the camera selects the correct shutter speed. Shutter mode is the same concept but you select the shutter speed and the camera selects aperture. Manual is a tool where you select both.
Next we looked at the area called "Reading the Light: How to recognize and use different types of light." In this section it focused on the different lighting you will face as a photographer and how to deal and adapt with them. It talked about the different such as front light, sidelight, backlight, twilight, overcast light, and also the things to avoid and emphasize with lighting and what other tools are available. Obviously you want to avoid the high midday sun. The high sun can cause you pictures to be blown out and creates and overall poor photo. There are quite a few ways to enhance lighting when photographing such as; using clouds to reflect lighting, and flashes.
Thirdly the book focused on depth of field and "how to control and use in-focus picture areas for dramatic effect." Depth of field mainly focused on capturing the greatest detail or what you want to stand out. The primer is the part of the image you want to come in sharp so it focused on ways to capture that and what affects can be used. You may choose to have the primer come in very sharp and blur the remainder of the picture to create a more direct image. You could also use things such as hyperfocal so you would get a sharp picture from horizon to horizon. The book also talked about the automated ISO control which allows you to select your shutter speed and aperture and then the camera makes adjustments to ISO between shots. This allows for the proper exposure to be shot.
The fourth thing we read about was motion effects and "using the shutter speed and camera movement to control the effect of motion. Obviously the main thing used for capture the motion effect is shutter speed. Shutter speed can allow for you to capture an image to where it appears to be frozen or it can also allow for a blur effect to portray the image as moving. There are many factors that come into play when using shutter speed for motion. Things such as direction object is moving (towards you, laterally, etc), how you want the image to appear, speed of the object, size, and so on. The book also talked about ways to avoid blurring such as panning. This allows for a motion effect but not so much blur. Next it talked about using blurring for an effect which requires a correct exposure and quite a bit of experimenting. You may also chose to do blurring digitally by viewing the image and making the necessary corrections.
Modifying Natural Light was the next area that the book focused on. This is done by using different filters and also by using reflectors. You can use filters such as polarizing filters to producing greater saturation and reduce glare or you can use filters such as a split neutral density filter or graduated neutral density filter for a more "customized" correction. The last tool the book discussed for modifying light was reflectors which can be used to add emphasis on light or color and also adds a filler to dark areas.
The last two areas section two focused on was designing the picture space and photographs as impressions. The most important "rules" for nature photography were discussed in designing picture space. This are the rules we learned previously which are; red is more attractive than yellow; large draws more attention than small; difference draws more attention than conformity; jagged lines are more striking than curved ones; diagonal lines are more attractive than vertical ones; sharpness is more attractive than blur; and lastly and most importantly light is more attractive than dark. If you live by these rules in the photography world you will most likely capture a good image. Photographs as Impressions focused mainly on capturing a different view on images. It talked about patterns, angles, selective focus, and other ways of capturing a great image.
Thursday, November 4, 2010
Nature Photography Section One Recap
The first topic in section one was on the basic kit or what Fitharris calls the "Essential Equipment for Photographing the Natural World." It started off by talking about the basics which are the camera and tripod. The camera needs to have; depth-of-field preview, high-speed image capture (+3 frames/sec) and capability of a shutter release. The next things you should purchase for you photography equipment is a super-telephoto lense so you can get those close range full photo shots. This section also talked about basic things such as filters, extension tubes. and tele-converters.
The next main topic addressed was Tripods. The tripod is really the key to taking a good picture. You want something that is sturdy yet easily compactible and very portable. There is much more put into a tripod than I would ever expect. The most common type of head is a ball-and-socket head that can pan but for large heavy telephoto lenses you want a gimbal-type head for good stability, balance, and quick control.
The third area looked at in section one was super-telephoto lenses. Focal length is a key to picking the right super-telephoto lense. The most common and best overall super-telephoto lense is a 500mm. It is the most mobile for its type and is a good all arounder. If you are looking for a cheaper way you could do a 300mm or 400mm with a teleconverter but your picture quality will not look as well. The next few things to look at when working with a super-telephoto lense are; Lens speed, focusing, stabilization, and the focus.
The next to topics that I am going to combine are; working in the field and winter photography. Both of these topics to me seemed pretty much common sense. Obviously you want to be prepared for anything when you are out there working especially in the cold bitterness of winter. When working in the field you want to play close attention that you have all the tools necessary for any type of weather (this includes things for both you and your gear.) You want to have backups for all you gear such as memory cards, batteries, camera (if possible) etc. Make sure you have everything you need to keep you warm and safe and always remember layering is the best option.
The last topic Tim Fitharris talked about in section one was a "month-by-month guide to the best North American shooting sites." This area just looked at what aspects are best to capture where during specific months. It is a guide for the photographer to capture the best nature photography picture during a certain time. My top three picks would probably be the months of August, September and October. Mainly because it is my favorite time of the year and all the examples given seemed ideal for capturing the most amazing colors in nature. The examples were Mount Rainer in August, Yellowstone and the Tetons in September and the Great Smoky Mountains in October.
Wednesday, October 27, 2010
Padlock Ranch
 |
| Padlock Ranch Horse by William Albert Allard |
Overall I found the picture to be really good and really drawing. You almost feel the cold by looking at it and I think this is an excellent key to a photo. You want to draw the observer in and I think Allard did just that. I don't know if it is because I am a Montanan and know how biting that blowing cold can be or if it is purely the picture but I feel he did a great job.
Wednesday, October 20, 2010
Landscape Techniques
My second blog for the week was on an article called "Special Techniques for Landscape" by Rob Sheppard. The article was excerpts from Sheppard's new book, The Magic of Digital Landscape Photography. The article started out by discussing the techniques that we all learn at the beginning. These were things such as; Composition, exposure, depth of field, etc. It stated how these are the common tools used but there are other ways of capturing a great photo.
The first technique discussed by Sheppard was black and white. He talks about the fact that black and white has a way of grasping an image in a very open minded way. You have to forget all you know about color and capture the bare essence of the image. It also is a great way to capture depth in a photo and contrast between light and dark objects. The main thing he points out is just how useful it is at creating a different view than you would normal get. It really does give you a different view and puts an artistic touch in your technique of capturing an image.
The second technique Sheppard discussed for landscape photography is High-Dynamic Range Photography aka "HDR." HDR allows you to combine multiple exposure pictures into one to create the most dynamic tone in a photo. A tone that you would not necessarily be able to capture with a single shot. This technique is used in the photography world and is a common technique by the famous photographer Ansel Adams.
Lastly Sheppard talked about the technique of using infrared. Infrared allows for you to photograph in the light we typically would not even consider. It is a way to increase the drama in a photo and get colors and traits to pop in an image and a great technique for that midday sun. Overall Sheppard had great traits and really allowed for some alternatives to the everyday technique many of us use.
Photography and The Law
For this weeks article blog I decided to change it up a bit and try something totally different. I found an article from popphoto.com on the laws of photography and how they are being viewed and changed. The article was from the British Journal of Photography and was titled "Homeland Security Settles Photographer's Rights Case, Issues New Guidelines to Police."Homeland Security Settles Photographer’s Rights Case, Issues New Guidelines to Police."
The article involved the Department of Homeland Security and photographer who had faced some controversy on filming a protest that took place outside a Manhattan Courthouse. Photographer Antonio Musumeci was arrested roughly 6 months ago for recording the protest. He was fined and expected to pay fees related to the arrest which was not properly enforced. Following the arrest, Musumeci began claiming that his arrest was unfair and changes needed to take place.
The big debate was that if this was an enforced regulation signs needed to be posted and it must be a nationwide rule. Musumeci was refunded his fees and also given a reward for this happening. Law enforcement is now being trained to understand that all photography is completely legal around any public buildings. This will hopefully prevent future problems and allow for freedom of photographer throughout the united states.
Thursday, October 14, 2010


Tuesday, September 28, 2010
Yellowstone
After our trip to Yellowstone this past weekend I decided that I would use these pictures for my blog this week. The trip was great and really made you realize all the factors that come into play when you are actually out taking pictures in the field. Overall the colors were awesome this trip and by far was my favorite. The sun issue was a bit of a pain and really made you appreciate clouds and how they help with photography. I was actually pretty pleased with quite a few of my pictures so I decided I would post a few of the ones that I liked the best.


Tuesday, September 21, 2010
Maurits Van Wyk
 | ||||||
| Maurits Van Wyk: Stream Reflection |
I also really liked the leaves because they add that pop of color to create another interesting dynamic to the photo. The picture was just overall very interesting to me and really liked all the interesting things it has going. I can see many of the "rules" being used and thought it was really cool that so many of them can be brought into one photo.
Sky Photos: Picture Rules
 |
| Large draws more attention than small |
 |
| Diagonal lines are more attractive than vertical lines |
 |
| Difference draws more attention conformity |
 |
| Light is more attractive than dark |
Subscribe to:
Posts (Atom)